You can now create a drip email to send when Members purchase a specific Membership or Service.
Here are the steps:
Step 1. Create the email template you would like to use to drip.
Once the email template is saved, the Drip Email link will be available under the Actions column.
Click the 'Drip Email' link
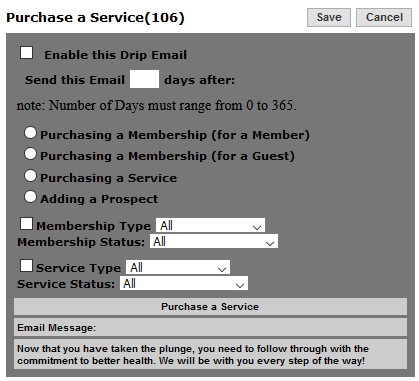
- When you are ready to begin sending the drip email, check the box 'Enable this drip email'. When the campaign is over, you can uncheck the box so the email no longer sends when the membership or package is purchased.
- Enter on which day - 0 through 365, where 0 is today - that you would like the drip email to send to the member.
- Select if it should be sent when a membership or service is purchased.
- Select the Membership Type or Service Type purchased that the drip is used for.
- Select the Membership Status or Service Package Status.
**Note ~ When creating the drip for a Service Package purchased, use Service Status 'All'.
**To set this up as a true marketing campaign so the member receives several emails over the course of time, such as 1 day after the purchase, 4 days after the purchase, 10 days after the purchase etc, copy the email contents into a new email template then enter 4 days after the service is purchased to send to the member.
The email template list will keep track of the drip emails you've created along with the schedule you created to send the emails in the 'Drip Market' column.
Step 2. Schedule the time of day the email should send.
- Tools -> System Settings -> Email/Text Settings.
- Enable the Drip Email process in your system.
- Check the box 'Enable Drip Email'.
- Enter the time of day the emails should send to the Member in military time (800, 1400, etc.).
- Click Save.
Comments
0 comments
Please sign in to leave a comment.